Do you use the Facebook Comments Social Plugin on your site or blog and ever wish to receive notifications via email each time a visitor leaves a comment?
So now it’s possible and super easy, with no need of server-side code or hosting (no PHP), only using Google Docs and a small JS/jQuery script code wrote by Gil Goldshlager (that’s me).
Adding email notifications to Facebook Comments-box plugin using Google Docs
Follow Gil’s full tutorial on this page: http://www.facebook.com/gil.goldshlager.dev/app_128953167177144
This tutorial will guide you how to add a feature to your Facebook Comments-box plugin that let you receive email notifications on new comments.
For this we are using Google Docs, which means there is NO need for a PHP hosting account to send the emails, so you can use it anywhere including on blogs like Blogger or Tumblr.
You will not receive any of the comments content to your email,
but it will be saved in your document, you will only receive a static email notification from Google Docs with a link to your document.
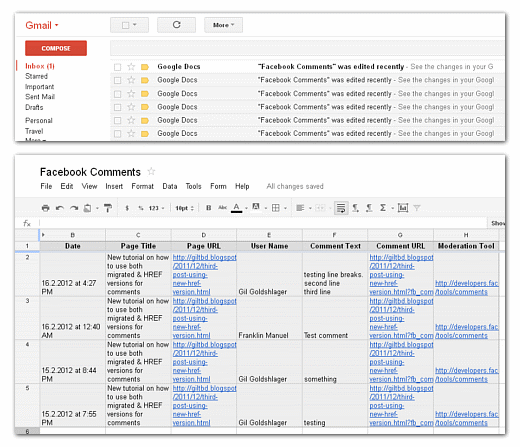
The comments content that will be saved in your document is:
- The Date
- Page Title
- Page URL
- User Name
- Comment Text
- Comment URL
- And a link to the official Moderation Tool
The result will look like this:
Step 1.
First you need to create a Google Docs form with 7 text fields.
for this visit docs.google.com and click on the CREATE button on the left sidebar, then choose Form from the list.

Rename the form “Untitled form” to the name you want will appear in the emails you will receive, for example: “Facebook Comments“.
Now we will create and set the 7 text fields.
Google automatically created the first 2 fields and we only need to rename them.
Where you see “Question Title” it means the field title so change the first “Untitled Question” to “Date” and click on Done.
Then rename the second field (“Qustion”) to “Page Title” and click on Done.
Now to create more 5 fields (to have 7 in total) click on the Add item button on the top left, and choose Text from the list,

Continue doing so to have in total 7 fields and rename they titles as:
Page URL , User Name , Comment Text , Comment URL , Moderation Tool .
When you done with the fields, click on Save.
Step 2.
Click on More actions and choose Embed from the list.

A small window will appear with the embed code, copy that code and for now just save it somewhere in the side (Notepad), we will back to it later.
Step 3.
Click on See responses and select Spreadsheet from the list.

Welcome to your document, this is where all the data will gonna get stored.
Click on Tools and select Notification rules… from the list,

A small window will appear where you enable the email notifications.
Check the options A user submits a form and Email – right away,
click on Save and then on Done.

Congratulations!, by that we have finished creating the form and setup the document notifications, you are now ready to go edit your website/blog template code in the next steps.
Step 4.
Let’s start edit your website/blog template, first you need jQuery,
in case that you don’t have jQuery yet, then add this script between your <head></head> tags:
<script type="text/javascript" src="http://code.jquery.com/jquery-latest.min.js"></script>
Step 5.
Add this script in the <head> anywhere after jQuery, doesn’t matter where, can be even placed before the close tag (</head>) :
<script type="text/javascript" src="https://fbcomments-email-notifications.googlecode.com/files/fbcen_gd.js"></script>
Step 6.
Adding the function-call with your form-id# to the Facebook JS SDK code:
Go back to your form embed code that you saved in the side, it looks like this:
<iframe src="https://docs.google.com/spreadsheet/embeddedform?formkey=dHtzRmb3XU5xMWJhS2Z0VlFNRGNFTVE4MQ" width="760" height="623" frameborder="0" marginheight="0" marginwidth="0">Loading...</iframe>
Now all we need from it is only the form-key code, for example in the code above it is “dHtzRmb3XU5xMWJhS2Z0VlFNRGNFTVE4MQ”.
This goes into a function-call name fbcen_gdocs and will look like this:
fbcen_gdocs('dHtzRmb3XU5xMWJhS2Z0VlFNRGNFTVE4MQ');
The function-call goes into the window.fbAsyncInit function, and after the FB.init .
Example:
<div id="fb-root"></div>
<script>
  window.fbAsyncInit = function() {
    FB.init({
      appId      : 'YOUR_APP_ID', // App ID       status     : true, // check login status       cookie     : true, // enable cookies to allow the server to access the session       oauth      : true, // enable OAuth 2.0       xfbml      : true  // parse XFBML
    });

    // Additional initialization code here
    fbcen_gdocs('dHtzRmb3XU5xMWJhS2Z0VlFNRGNFTVE4MQ');
  };

  // Load the SDK Asynchronously   (function(d){      var js, id = 'facebook-jssdk'; if (d.getElementById(id)) {return;}      js = d.createElement('script'); js.id = id; js.async = true;      js.src = "//connect.facebook.net/en_US/all.js";      d.getElementsByTagName('head')[0].appendChild(js);    }(document));
</script>
Your JS SDK code may look a little bit different, that’s fine,
as long as you place the code after the FB.init ends,
and before the close of the fbAsyncInit function.
Step 7.
Last part adding extra attributes to your comments-box plugin tag:
This is done to grab the page-title of where the comment has been posted,
if you find this part difficult for you then you can skip it.
There are 2 versions for the plugin, one XFBML, and another is HTML5.
Which version I got?
XFBML = <fb:comments></fb:comments>
HTML5 = <div class=”fb-comments”></div>
– for XFBML version there are 2 attributes: class=”fbcomments” and title=”my post title”
– for HTML5 version there is 1 attribute: data-title=”my post title”
This how:
XFBML    <fb:comments class="fbcomments" title="my article title"></fb:comments>

HTML5    <div class="fb-comments" data-title="my article title"></div>
The value of title/data-title will be the title of your post/article, usualy it will be a dynamic code of your site / blog system.
Dynamic codes for popular blogs / CMS:
Blogger:
The code: data:post.title

Use as:
expr:title="data:post.title"
expr:data-title="data:post.title"
Tumblr:
{block:PostTitle}{PlaintextPostTitle}{/block:PostTitle}
WordPress:
<?php the_title(); ?>
Textpattern:
<txp:title />
Forwarding from Gmail:
In case you don’t want to use Gmail then you can forward the nofitications to other accounts,
for forwarding instructions take a look at this page.
In case you do use Gmail but want to only forward the notifications,
then you need to create a filter, for the instructions take a look at this page.
Multiple recipients:
In case you want to send the nofitications to multiple recipients,
and also let them view the document, then all you need is to add them by clicking on the Sare button on the top right of your document page.

A “Sharing settings” window will appear where you can add peoples and change permissions.
After you added someone, that person will need to set the notifications rules just like you did in step #3.
Demo:
I created a special page where you can take a look of how the comments are being saved in the Google Docs, for the best way to experience it go and set the notifications rule in the tools,
as I explained in step #3, and then add a comment.
After you finish playing with the demo page, please do not forget to remove the notifications rule you have created, for not receiving future spam while someone else plays with it.
Important!
Do NOT click on any links in the document content, that is for security reasons.