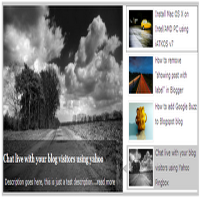
Blogger is not more a blogging platform for beginners, there are lot more can be made with a blogger / blogspot blogs. Featured content sliders are seen in many WordPress blogs and when coming to blogger it is certainly not much seen. Here I am going to teach you, how to add a featured content slider to your blogger / blogspot blogs. Many thanks to Webdeveloperplus for making this code and I just tested and modified to work on blogger.

Step 1: Let get into the coding part. Here I just made a CSS stylesheet, to make the installation pretty simple. So all you need to do is just copy the below code and paste it after <head>
<link href='http://sites.google.com/site/bloggermintcom/style1.css' rel='stylesheet' type='text/css'/>
Step 2: If you need to change the dimensions of the slider you can use this step instead of step 1. Search for the code
]]></b:skin>
Now the place the below code before ]]></b:skin>
#featured{
width:400px;
padding-right:250px;
position:relative;
border:5px solid #ccc;
height:250px;
background:#fff;
}
#featured ul.ui-tabs-nav{
position:absolute;
top:0; left:400px;
list-style:none;
padding:0; margin:0;
width:250px;
}
#featured ul.ui-tabs-nav li{
padding:1px 0; padding-left:13px;
font-size:12px;
color:#666;
}
#featured ul.ui-tabs-nav li img{
float:left; margin:2px 5px;
background:#fff;
padding:2px;
border:1px solid #eee;
}
#featured ul.ui-tabs-nav li span{
font-size:11px; font-family:Verdana;
line-height:18px;
}
#featured li.ui-tabs-nav-item a{
display:block;
height:60px;
color:#333;  background:#fff;
line-height:20px;
}
#featured li.ui-tabs-nav-item a:hover{
background:#f2f2f2;
}
#featured li.ui-tabs-selected{
background:url('http://i47.tinypic.com/6jojr4.jpg') top left no-repeat;
}
#featured ul.ui-tabs-nav li.ui-tabs-selected a{
background:#ccc;
}
#featured .ui-tabs-panel{
width:400px; height:250px;
background:#999; position:relative;
}
#featured .ui-tabs-panel .info{
position:absolute;
top:180px; left:0;
height:70px;
background: url('http://2.bp.blogspot.com/_ubwIhqPcR6M/TNv3EFphS6I/AAAAAAAABHE/iZ0jSrh-E_c/s1600/transparent-bg.png');
}
#featured .info h2{
font-size:18px; font-family:Georgia, serif;
color:#fff; padding:5px; margin:0;
overflow:hidden;
}
#featured .info p{
margin:0 5px;
font-family:Verdana; font-size:11px;
line-height:15px; color:#f0f0f0;
}
#featured .info a{
text-decoration:none;
color:#fff;
}
#featured .info a:hover{
text-decoration:underline;
}
#featured .ui-tabs-hide{
display:none;
}
Step 3: This step involves the featured content structure. Search for the code
<div id='content-wrapper'> and place the below code just before
<div id='content-wrapper'>
<div id='featured'>
<ul class='ui-tabs-nav'>
<li class='ui-tabs-nav-item ui-tabs-selected' id='nav-fragment-1'><a href='#fragment-1'><img alt='pic1' src='http://i49.tinypic.com/e1aohv.jpg'/><span>Install Mac OS X on Intel/AMD PC using iATKOS v7</span></a></li>
<li class='ui-tabs-nav-item' id='nav-fragment-2'><a href='#fragment-2'><img alt='blogger' src='http://i438.photobucket.com/albums/qq108/fooble11/image2-small.jpg'/><span>How to remove "showing post with label" in Blogger</span></a></li>
<li class='ui-tabs-nav-item' id='nav-fragment-3'><a href='#fragment-3'><img alt='buzz' src='http://i438.photobucket.com/albums/qq108/fooble11/new1.jpg'/><span>How to add Google Buzz to Blogspot blog</span></a></li>
<li class='ui-tabs-nav-item' id='nav-fragment-4'><a href='#fragment-4'><img alt='chat' src='http://i50.tinypic.com/34xfg4m.jpg'/><span>Chat live with your blog visitors using Yahoo Pingbox</span></a></li>
</ul>
<!-- First Content -->
<div class='ui-tabs-panel' id='fragment-1' style=''>
<img alt='mac' src='http://i47.tinypic.com/rsbi80.jpg'/>
<div class='info'>
<h3><a href='#'>Install Mac OS X on Intel/AMD PC using iATKOS v7</a></h3>
<p>Description goes here, this is just a test description....<a href='http://www.bloggermint.com/2010/02/install-mac-os-x-on-intelamd-pc-using.html'>read more</a></p>
</div>
</div>
<!-- Second Content -->
<div class='ui-tabs-panel ui-tabs-hide' id='fragment-2' style=''>
<img alt='' src='http://i50.tinypic.com/33kprh5.jpg'/>
<div class='info'>
<h3><a href='#'>How to remove "showing post with label" in Blogger</a></h3>
<p>Description goes here, this is just a test description....<a href='#'>read more</a></p>
</div>
</div>
<!-- Third Content -->
<div class='ui-tabs-panel ui-tabs-hide' id='fragment-3' style=''>
<img alt='' src='http://i47.tinypic.com/2191lqt.jpg'/>
<div class='info'>
<h3><a href='#'>How to add Google Buzz to Blogspot blog</a></h3>
<p>Description goes here, this is just a test description....<a href='#'>read more</a></p>
</div>
</div>
<!-- Fourth Content -->
<div class='ui-tabs-panel ui-tabs-hide' id='fragment-4' style=''>
<img alt='' src='http://i48.tinypic.com/10pwp3o.jpg'/>
<div class='info'>
<h3><a href='#'>Chat live with your blog visitors using yahoo</a></h3>
<p>Description goes here, this is just a test description....<a href='#'>read more</a></p>
</div>
</div> </div>
Replace the default image URL with your image URL. The bigger image dimension is 400 * 250 and for smaller its 80 * 50. Do insert your image with these dimensions, to make it look better. Also replace the text and link with your info.
Step 4: Now we need to initialize a script to play the slide show. For that we use this script. Place the below script just after <head>
<script type='text/javascript'>
$(document).ready(function(){
$("#featured").tabs({fx:{opacity: "toggle"}}).tabs("rotate", 5000, true);
$("#featured").hover(
function() {
$("#featured").tabs("rotate",0,true);
},
function() {
$("#featured").tabs("rotate",5000,true);
}
);
});
</script>
Step 5: This is an optional step, if your blog already includes the jQuery and jQuery UI libraries. If not, follow this instructions. Copy the code below and paste it after <head>
<script src='http://ajax.googleapis.com/ajax/libs/jquery/1.3.2/jquery.min.js' type='text/javascript'/>
<script src='http://ajax.googleapis.com/ajax/libs/jqueryui/1.5.3/jquery-ui.min.js' type='text/javascript'/>
You are done, check to see the effect. If you have any troubles in executing this technique, drop in your comments. Click here to see the live demo