When I was looking for my next blog post, I came around a website, which has an opacity header in fixed position. The next thing came in my mind was to come make that same feature happen in Blogger. So to make that happen I used opacity script developed by David Walsh and I modified the script to make it work on Blogger platform. This tutorial will let you to add a header with opacity using jQuery and you can its easily editable to add more options within this feature and before heading into the tutorial, take a backup of your template. So here we go.


Step 1: Login to your Blogger dashboard and navigate to Layout > Edit HTML. Now check the “Expand Widget Templates” and search for the code <head> and replace it with the below code
<head>
<script src='http://sites.google.com/site/bloggermint/jquery-1.4.2.min.js' type='text/javascript'/>
<script type='text/javascript'>
$(document).ready(function() {
(function() {
//settings
var fadeSpeed = 200, fadeTo = 0.5, topDistance = 30;
var topbarME = function() { $('#opacitybar').fadeTo(fadeSpeed,1); }, topbarML = function() { $('#opacitybar').fadeTo(fadeSpeed,fadeTo); };
var inside = false;
//do
$(window).scroll(function() {
position = $(window).scrollTop();
if(position > topDistance && !inside) {
//add events
topbarML();
$('#opacitybar').bind('mouseenter',topbarME);
$('#opacitybar').bind('mouseleave',topbarML);
inside = true;
}
else if (position < topDistance){
topbarME();
$('#opacitybar').unbind('mouseenter',topbarME);
$('#opacitybar').unbind('mouseleave',topbarML);
inside = false;
}
});
})();
});
</script>
In this step you can remove the jQuery script, if you have already initialized it on your blog.
Step 2: Now we are going to add the CSS code, which is responsible for appearing the opacity header on the top. So search for the code ]]></b:skin> and replace it with the below code
#opacitybar	{
	border-bottom:1px solid #ECF1EF;
	background:#151715;
        font-color:#000000;
	padding:10px 20px;
	position:fixed;
	top:0;
	left:0;
	z-index:2000;
	width:100%;
}
]]></b:skin>
Here you can change the color of the header bar by changing the background value.
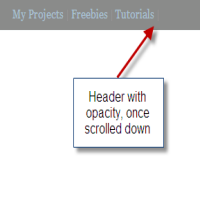
Step 3: At this stage, we are heading to insert the functions to be visible on the header bar. So here I inserted basic navigation link to be seen inside the header bar, but this can be changed according to your own ideas. Search for the code <div id='header-wrapper'> and replace the below code before <div id='header-wrapper'>
<div id='opacitybar'>
	<a href='#'>My Projects</a> |
	<a href='#'>Freebies</a> |
	<a href='#'>Tutorials</a> |

</div>
Save the template, to see the changes. If you have any troubles in making it work on Blogger platform, drop in your comments.