Life as a new WordPress web developer is not all glamorous and comes with a steep learning curve. After a handful of broken websites, hours of online research, and lots of yelling at my computer screen, I finally figured out how to move a WordPress blog to a new server. To some of you nerds out there I’m sure this sounds like child’s play, but to us lesser nerds this can be quite the task. This post is about how to migrate your website without any downtime, and I did my best to make this as easy to follow as possible.
If you have a blog that gets lots of traffic and needs to move to a different server, but you can’t afford to lose the precious eyes of your visitors for even a second, you may want to keep reading.
Here is a short list of the steps required to successfully migrate your WordPress site:
- Back Up Your WordPress Blog
- Create an Add-on Domain
- Install WordPress
- Overwrite WP-Content Folder
- Import Database
- Point DNS
- Update Permalinks
1. Back Up Your WordPress Blog
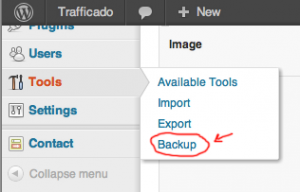
First things first, you better back up your goods. If you already know how to do this, go on and skip ahead. For those of you who need more explaining, I’m happy to help. I like to use the “WP Database Backup Plugin.” Once you download and install the backup plugin, go to the “Tools” section on your Dashboard and click “Backup”

Database Backup
This plugin enables you to setup a schedule for your database to be sent to you via email anytime. What you want to do is download a SQL file of your database to your local machine.

XML Backup
Just to be safe you may want to backup your database as an xml file as well. Go to “Tools” again and just click “Export.” Once you’ve clicked that make sure you download all the content. This just saves your database as an XML file.

One last thing you want to backup is your “WP content” folder. This folder has all of your themes, widgets, plugins and anything else that makes your blog your blog. You will need FTP access to your server in order to download this folder. When you get into your server save the “wp-content” folder to your local machine.
That is everything you will need to do in order to safely backup up your blog. Make sure you keep all of these items in an easy-to-find folder because you will need to send files in order to successfully migrate your website.
2. Create an Add-on Domain on Your New Server
Once you have figured out where you will be hosting your blog, you need to create an add-on domain on your new server. All servers have a different interface and it may be tricky to find where you can do this. Most servers have a button that simply reads “Add-on Domain.” Below I have placed a snapshot of what I see in my JustHost.com account:

Most server control panels have this type of button or something very similar to it. When you click this button it will allow you to add your already existing domain onto your new server. When you create an add-on domain you are also creating a new database for you to store your website’s files.
3. Install WordPress
This part is pretty easy! You will want to go into your control panel of the server where you just created an add-on domain. Most servers now use Simple Scripts, a one-click WordPress installer. Other hosting companies use Fantastico Deluxe, which is just another WordPress…installer. They are both pretty intuitive, so you shouldn’t have too much fuss figuring it out.
*Those who do not have the option of installing WordPress with one of these “easy buttons” should install WordPress manually.
4. Overwrite the “wp-content” Folder
This step is simple if you have FTP access to your new server. The wp-content folder that you downloaded from your old server contains all of your themes and style sheets; replacing the new content folder with the old one is essential to getting your site just the way you had it. You need to overwrite the wp-content in your new server with that old wp-content folder through your FTP account
And voila! You’re almost done migrating your site!
5. Import Old Database into New Server
Remember that SQL file you backed up? Now is the time you are going to use it. Go into the control panel of your new server and find the “phpMyAdmin” button.

In phpMyAdmin you will be able to import the old database into your new server.
*If you have more than one database attached to your server, you may have trouble finding which database to import to (e.g., wrdp_1, wrdp_2). You need to download the wp-config file from the root folder in FTP. In that file you will be able to read which database you need to import to.
6. Point DNS to New Server
Congratulations! All of the hard stuff is over. Now you just need to point your Domain Name Server (DNS) to your new server, and then you have reached the end of your migration.
Give this some time seeing how it may sometimes take at least 72 hours for the DNS to propagate. Once you are sure that the DNS is fully transferred you can delete the database from your old server, and kiss that server good-bye!
7. Update Permalinks
This step isn’t always necessary, but you may need to update your permalinks if your pages are showing a 404 page (no worries! This takes approximately 10 seconds). Go into the backend of your WordPress site and click on “settings” → “permalinks” and then press the update button, simple as that!
Conclusion
Now you can enjoy your old website on your new server. I hope these directions are clear and helpful. Please feel free to leave comments with questions, or other tips to make this process even easier. Thanks for reading!
Guest post by Edward Houstman, web developer at Trafficado.